|
How
to build a MSI K9N Diamond
from the ground up - REV 8.0
Updated:
Tuesday, May 17, 2011
To ensure you are
viewing the latest version, use your "Refresh" key
Although I wrote these procedures specifically for a
MSI K9N Diamond
they can be applied to any PC
build. Check your mainboard manual for specific
details.
|
Would you like to help me?
View Feedback
Leave Feedback
|
Menu
Parts
How to save $$$
Before you start
Choose a clean room
About the Mainboard
ATX case chassis
ATX power supply unit
The CPU and heatsink
Back IO Shield
Mount the mainboard to the
tray
System fans
Connectors
Barebones?
Inspect your optical (IDE)
devices
Floppy drive
Hard drives
Video card(s) and
SLI
Hook up the power
LAN (RJ-45) Jack and/or modem
Clear the CMOS
DDR2 DIMM
The initial boot
Post-boot Initial Checks
AMI bios
The Operating System installation
Check for stability
Driver installation
Adding other devices
Congratulations!
Troubleshooting |
|
Parts
Check the
MSI K9N Diamond
support page at the MSI website and view the
Test Report to see what hardware has been tested and is
certified to work with the MSI K9N Diamond.
Don't purchase anything that is not on the approved list.
Here is a list of the parts you will need to build
your MSI K9N Diamond.
-
MSI K9N Diamond
mainboard
-
AMD Athlon 64/FX/X2 or Sempron AM2 CPU
-
Heatsink and Thermal Paste
-
ATX Chassis
-
500W or better name-brand Power Supply (PSU) with at least 28A
on +12v
-
Hard Drive(s) IDE or SATA (IDE and SATA cables are included in
the box)
-
DDR2 DIMM(s) 240-pin (533/667/800)
-
PCI-E Video Card(s) (two for SLI)
-
Floppy Drive and FDD cable (optional)
-
Optical Drive(s) (DVD-RW/CD-RW)
-
Monitor
-
Speakers
-
Keyboard
-
Mouse
-
Operating System
-
metal standoffs to attach mainboard to ATX tray
-
Assorted screws/washers that will come with the
ATX Chassis
Parts list
(.pdf)
Be a smart shopper. Purchasing parts
locally is best but this option is not always available to everyone.
Comparison shop at a minimum of two stores. Three or four
stores would be perfect. If you have to shop online the same
principals apply.
Be advised that some stores will give you a better
deal if you pay in
cash vice a credit card.
This is especially true when
merchant accounts charge larger fees to process the payments. You may be able to
save as much as 10% which equates to extra $$$ for a lot of upgrade
ability. The objective here is to get the most
"bang-for-your-buck."
IMPORTANT:
Here is a list of the parts I
purchased and how much they cost.
RETURN TO MENU
|
|
How to save $$$
This section is for those on a budget. Not
everyone can afford $700, $1000, $1250, $1500 USD or more all at
once. By re-using parts from your old PC you can save a lot of
cash. In addition, you don't need to purchase everything right
away, you will need just the bare essentials for your initial build.
Keep in mind if you are on a
budget you don't need the best CPU,
best video card, or a lot of DIMMs. If you are able to re-use
your old PC parts you can get by with spending less than $345 USD
on budget parts. If you have extra
cash spend it on the CPU, DIMMs, and video card.
Minimum parts required (the bare essentials to build
your new PC):
- MSI K9N Diamond
mainboard
- AMD Athlon 64/FX/X2 or Sempron AM2 CPU
- Heatsink and Thermal Paste
- One stick of DDR2 DIMM 240-pin (533/667/800)
- One PCI-E Video Card
- ATX chassis
- Power Supply Unit (see
my recommended PSU requirements below)
- One Hard Drive
- One Optical Drive
- Monitor
- Speakers
- Mouse
- Keyboard
- Operating System
These items you will normally have to purchase with
the understanding that you will be re-using parts from your old PC:
-
MSI K9N Diamond
mainboard, about $160 USD
-
AMD Athlon 64/FX/X2 or Sempron AM2 CPU, low-end about $40 USD
-
Heatsink and Thermal Paste, usually comes with the CPU
- DDR2 DIMM 240-pin (533/667/800), 1GB about $30 USD
- PCI-E Video Card, 256MB about $40 USD
- ** Power Supply Unit (see
my recommended PSU requirements below). Due to the
unique PSU requirements of the
MSI K9N Diamond
mainboard you most likely will have to purchase a new
PSU, about $75 USD
Here is a list of the parts you can re-use from your
old PC until you have the cash available to purchase upgrades.
Of course this all depends on the age of your old PC.
Parts list
(.pdf)
RETURN TO MENU
|
Before you start
Print the Bios settings from this website
and keep for later.
Before you begin, read this entire procedure from top to
bottom.
It's better to read and understand everything before you actually start
the hardware assembly process.
The average build time for a novice is estimated to be between 3 and
4 hours. Build time is just the time it takes to assemble the
system. It does not include powering up the system for the
first time. If this is your first build I recommend going slowly.
If you are an expert and have build many PCs you could probably
do it in less than 2 hours (and I'm sure you don't need my help!).
Make sure you have the following on hand:
- Phillips screwdriver
- Flashlight
- Electrical tape
- Needle-nosed pliers
- A few small containers to divide the different size screws and
metal standoffs
- Small knife to open security tape on boxes
Warranty Information. When you open the various component
boxes, look for the warranty information for each component and keep
them all in one place. I keep mine in the
MSI K9N Diamond box. Some components will require you
to mail a warranty card or register the product online.
Keep the empty boxes for a while, at least until your system is
stable. This makes it easier if you have to return a component for
replacement. After your PC is stable you can throw the empty boxes
in the garbage, if you desire.
RETURN TO MENU
|
|
Choose a clean room
Choose a clean room to assemble your
MSI K9N Diamond. A room with ceramic
tile or a wooden floor is best. A carpeted room is worst.
I assembled my PC on my kitchen countertop where there was plenty of
light.
Before you touch the mainboard ground yourself by touching the power supply
or the ATX
case. Grounding straps are a good investment and they are
very cheap.
Wash your hands to remove any grease or body oil. If you
have long hair wear a hair net or hat.
Remove the soda cans and/or other drinks, food, etc. from the
work area. You don't need the hassle of a spill.
RETURN TO MENU
|
|
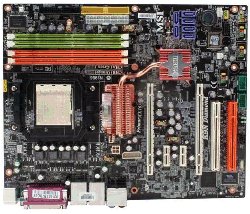
About the Mainboard
Handle your MSI K9N Diamond
mainboard like it's a fine piece of chinaware or glass
crystal.
 When you take the boxed mainboard home from the store
make sure you
protect the box. Don't place anything on top of the box,
etc. Make sure the box doesn't slide around in the back of
the car. When you take the boxed mainboard home from the store
make sure you
protect the box. Don't place anything on top of the box,
etc. Make sure the box doesn't slide around in the back of
the car.
Once you are home and have the box open
-
do not:
- handle it excessively
- apply excessive force
- touch the mainboard circuits
- flex it
- drop it
- bump it
- slide it across the table
- you get the idea :)
All in all the mainboard is built tough but
don't unnecessarily abuse it.
When working with your
MSI K9N Diamond
mainboard, leave it in the cardboard box with the foam sheet at
the bottom of the box until it's time to attach it to the
mainboard tray.
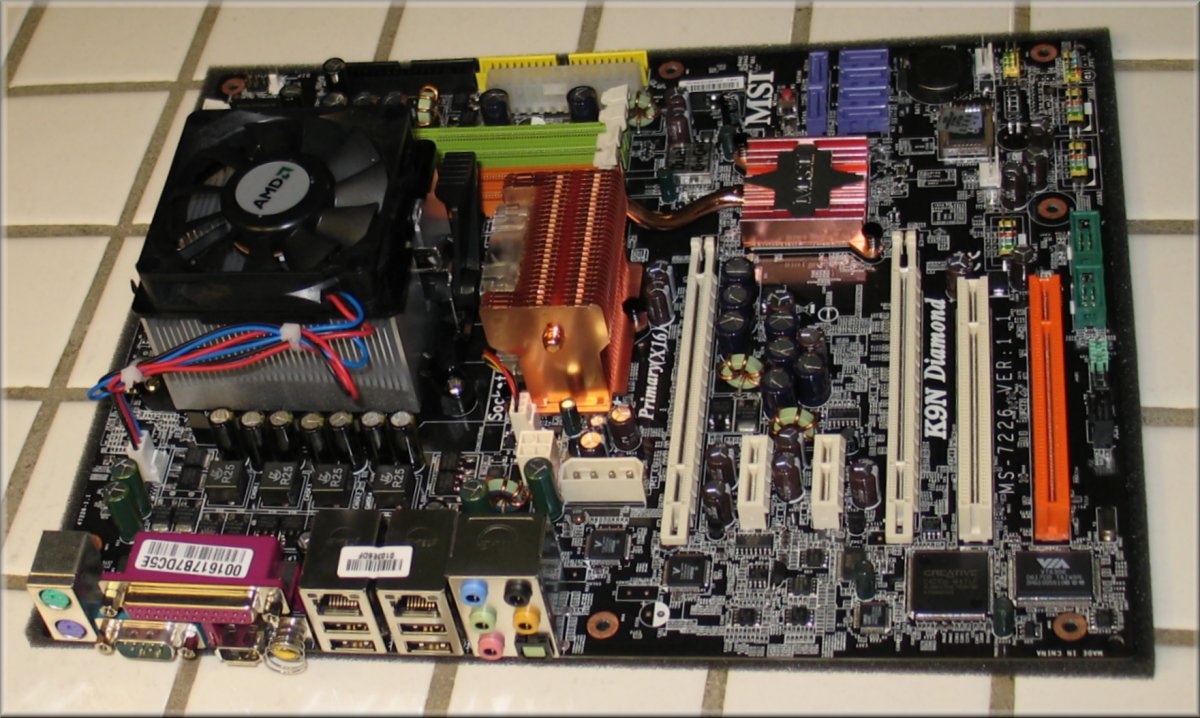
Examine your Mainboard closely to get a good feel of it's
layout. Match items on the Mainboard with those in the "Quick
User's Guide". Becoming familiar with the layout of the
mainboard now will save time later in the build process.
RETURN TO MENU
|
|
ATX Case Chassis
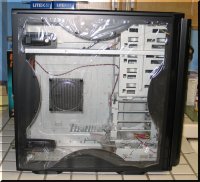 Choose a good
mid-tower ATX case or larger with at least: Choose a good
mid-tower ATX case or larger with at least:
- 2 external 5.25" bays
- 1 external
3.5" bay
- 3 internal 3.5" bays
If you are re-using your chassis from an old build make sure it is clean.
Remove all dust.
Depending on the chassis you choose you may want to perform some case modifications
prior to assembling your system. These modifications should
concentrate on your chassis air-flow for maximum cooling. Your
chassis should have fans that bring air into the front of the case
(intake) and out to the back of the case (exhaust). My case
has two 120mm fans.
If your ATX case came with instructions or a diagram review them
now.
Inspect the case and become familiar with its features.
Once you are ready to start the assembly process, take the side(s)/cover off your case. Do not replace the
side(s)/cover until your PC is running stable....or
until you've given up for the day..... then just throw a clean sheet
over it to prevent dust accumulation....
RETURN TO MENU
|
|
ATX Power Supply unit
 Your
MSI K9N Diamond will need a good name-brand 500W or better ATX power supply
with the +12v circuit rated for at least 28A.
Inspect the power supply cables closely. Count how many of each
power connectors you have. Choose a power supply with at least 4
SATA power connectors. The specific requirements are: Your
MSI K9N Diamond will need a good name-brand 500W or better ATX power supply
with the +12v circuit rated for at least 28A.
Inspect the power supply cables closely. Count how many of each
power connectors you have. Choose a power supply with at least 4
SATA power connectors. The specific requirements are:
-
ATX 12V 2.0
-
PFC
-
Minimum of 28A on the +12v circuit
-
Universal 24-pin Main Power Connector
-
1 4-pin +12V Power Connector
-
2 6-pin PCI Express Power Connectors (if
you plan to use SLI)
-
4 5-pin SATA Power Connectors
-
6 to 8 4-pin Peripheral Power Connectors
-
1 or 2 4-pin Floppy Drive Connectors
A good
500W power supply will only cost about $70-$90 USD. If you have
to spend $150 USD on a good power supply it will be money well
spent. Do not purchase a no-name/cheap power
supply. A large
amount of MSI K9N Diamond problems are due to an inadequate power supply.
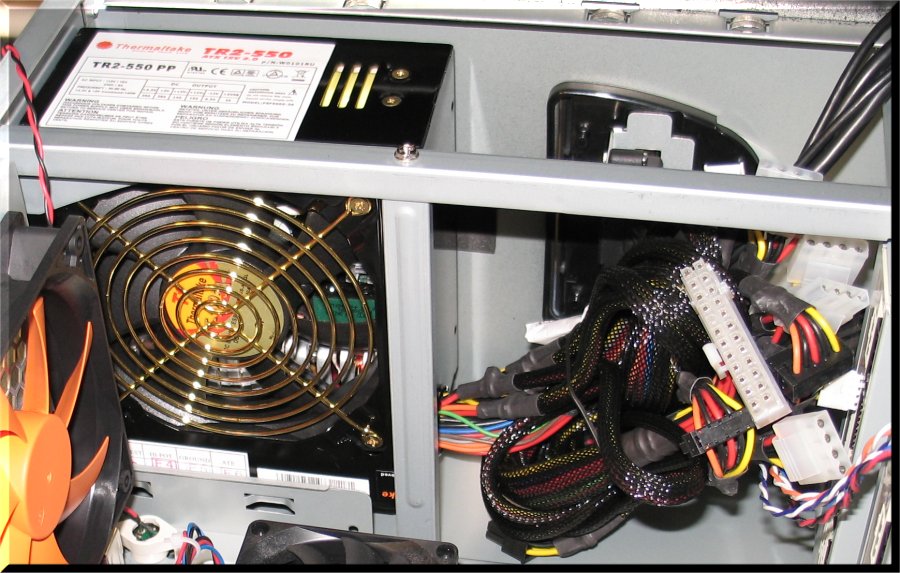
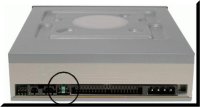
Install the Power Supply Unit.
If the back of your Power Supply Unit has an on/off
toggle switch ENSURE IT IS OFF. You don't want
your PC to boot as soon as you attach the power cord.
If
your ATX case did not come with an installed power supply, screw
your power supply into the top/back of your case. This is
usually accomplished with four screws into the back of the ATX case.
Most ATX cases also have a cross-bar that fits underneath the power
supply for added stability. Notice the cross bar in the photo
above. It attached with only one screw.
RETURN TO MENU
|
|
The CPU and Heatsink
For ease of installation it is best to install the
CPU and Thermal compound/heatsink/CPU fan BEFORE placing the
Mainboard into the ATX case. As mentioned above, leave the mainboard in the cardboard box with the foam sheet at the
bottom of the box until it's time to attach it to the mainboard
tray.
 To install the CPU: To install the CPU:
-
Pull the AM2 Socket lever
slightly sideways away from the socket and lift it up to a 90-degree
angle.
-
Remove your CPU from it's protective box and be careful
not to touch the pins with your fingers.
-
Hold the CPU by it's
edges.
-
Look at the CPU closely. Look for the Gold Arrow in
one of the CPU's corners and point/align it towards the lever pivot on
the mainboard CPU seat. THE CPU WILL ONLY FIT IN ONE
ORIENTATION.
-
Using very little force (gravity alone may suffice....)
drop the CPU onto the CPU socket seat and it's pins should all lineup
and the CPU pins should embed into the socket.
-
Hold the CPU down
with your fingers and close/lock the lever.
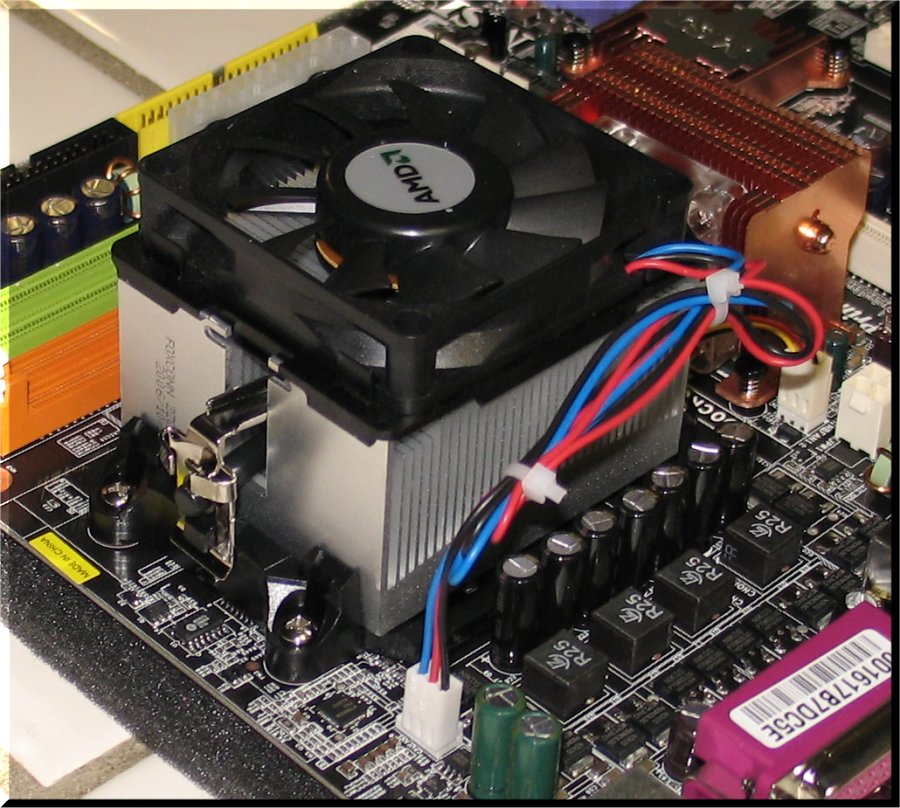
Heatsink Installation: Ideally you should be able to mount your heatsink on
the main board with the main board laying flat in the box it came
in. Leaving the foam sheet on the bottom of the box is even a
bigger plus.
My original
AMD Athlon 64 X2 4200+ 65W 2.20 GHz Windsor core
CPU and replacement
AMD Athlon 64 X2 6000+ Windsor 3.0 GHz
both came with a stock heatsink and fan.
Most heatsinks fit very tightly to the Retention
Mechanism and you may have to use a large amount of force.
Look at your heatsink closely. IT IS EXTREMELY
IMPORTANT TO GET THE ORIENTATION CORRECT. The heatsink must be
seated correctly on the CPU or else you WILL have trouble with high
temperatures or system stability.
The mainboard CPU AM2 socket Retention Mechanism will have one lug on each
side. This is where the heatsink clips/hooks will attach.
Since applying the heatsink to the mainboard is such a tricky
evolution you may want to practice once or twice before apply the thermal compound to the top
of the CPU die. Once you are ready for the actual installation
here is how to
apply
the Thermal compound.
NOTE: Some heatsinks come with thermal compound
already installed, you only have to remove a piece of tape.
Take great care when attaching the heatsink latches to
the CPU AM2 socket Retention Mechanism. You may have to use a screwdriver and press
down with a significant amount of force to get the latch in locking
position. I just used my fingers. BE VERY CAREFUL.
If you use a screwdriver don't let it slip or you many inadvertently damage/score
your mainboard. On some larger heatsinks it may be easier for you to detach the CPU fan
from the heatsink
during this evolution and reinstall it after the heatsink is securely
latched on
the mainboard. See your specific heatsink installation
instructions for more details.
Once your heatsink is installed plug the CPU fan into CPUFAN1.
RETURN TO MENU
|
|
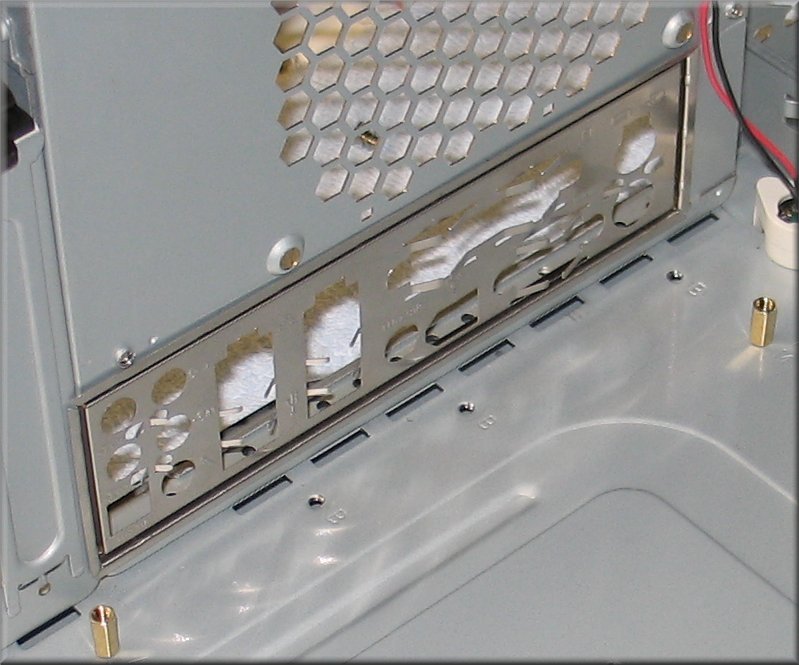
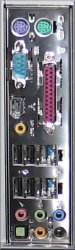
Back IO Shield
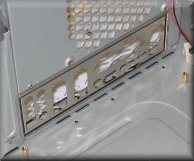 Fit
the Back IO Shield into the back of your ATX case. It is
installed from the inside of the ATX case. It should fit
tightly with no gaps on all four sides. Fit
the Back IO Shield into the back of your ATX case. It is
installed from the inside of the ATX case. It should fit
tightly with no gaps on all four sides.
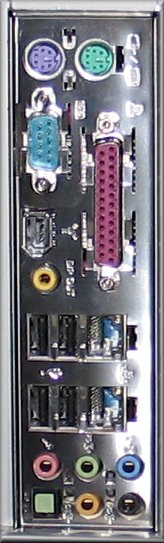
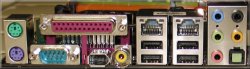 The
Back IO Shield will mate with the Back Panel connectors. The
Back IO Shield will mate with the Back Panel connectors.
NOTE: You may
have to remove the old IO Shield if one came with your ATX case.
Push from the outside-in to remove it.
RETURN TO MENU
|
|
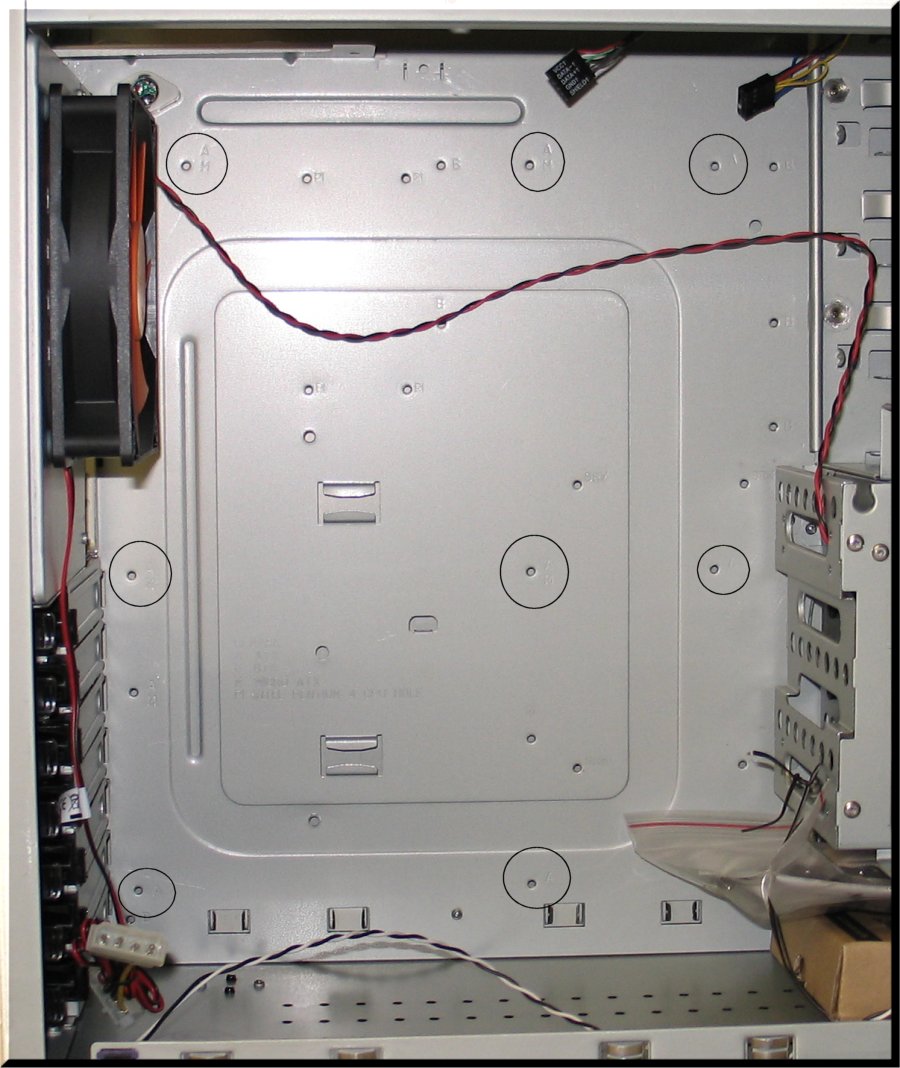
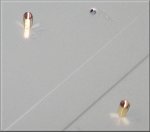
Mount the Mainboard to the
Tray

For the MSI K9N Diamond you will use nine
metal standoffs, one for each standoff hole marked "A" on the
ATX case mainboard tray. Most ATX cases will have the standoff
holes marked with the letter "A" as shown in the picture on the right.
Look at
the photo on the right. If you look closely you will see the letter "A" marked next to the
standoff holes on the mainboard tray. I have marked these with a
black circle in the photograph on the right. The "A" stands for
the ATX standard.
Since all ATX chassis' are different perform a preliminary match-up
of the 9 holes on the mainboard and the holes on the mainboard tray.
Perform this test twice, once with no standoffs in place and
second time with standoffs in place on the mainboard tray. These
step will help you to orientate the position of the mainboard better and
ensure everything is lining up correctly.
 Install the NINE
(9) metal standoffs onto the mainboard tray. Install the NINE
(9) metal standoffs onto the mainboard tray.
Properly mount the mainboard onto the ATX case mainboard tray on top
of the standoffs with 9 screws. The first screw should be placed
nearest the Back Panel connectors.
Take
special care in seating the spring on the Optical S/PDIF-Out
connector. It should not be sticking outside the back side of the
Back IO Shield.
It is extremely important that you use all 9 standoffs/screws to
ensure the mainboard is supported, especially in the middle of the
board. You don't want to be in a position where the board flexes
when you install DIMM or PCI cards.
NOTE: The
MSI K9N Diamond mainboard does not require washers. It has built-in washers around the
screw holes on the mainboard.
Ensure your carefully lineup the Back Panel connectors with the holes
on the Back IO Shield.
IMPORTANT: Make sure the only
metal touching your mainboard are the nine standoffs. Otherwise
your mainboard may suffer an electrical short. Use a good quality
electrical tape to patch any metal object that appears to be in danger
of touching the mainboard. Any chassis that was designed well will
not have this problem.
RETURN TO MENU
|
|
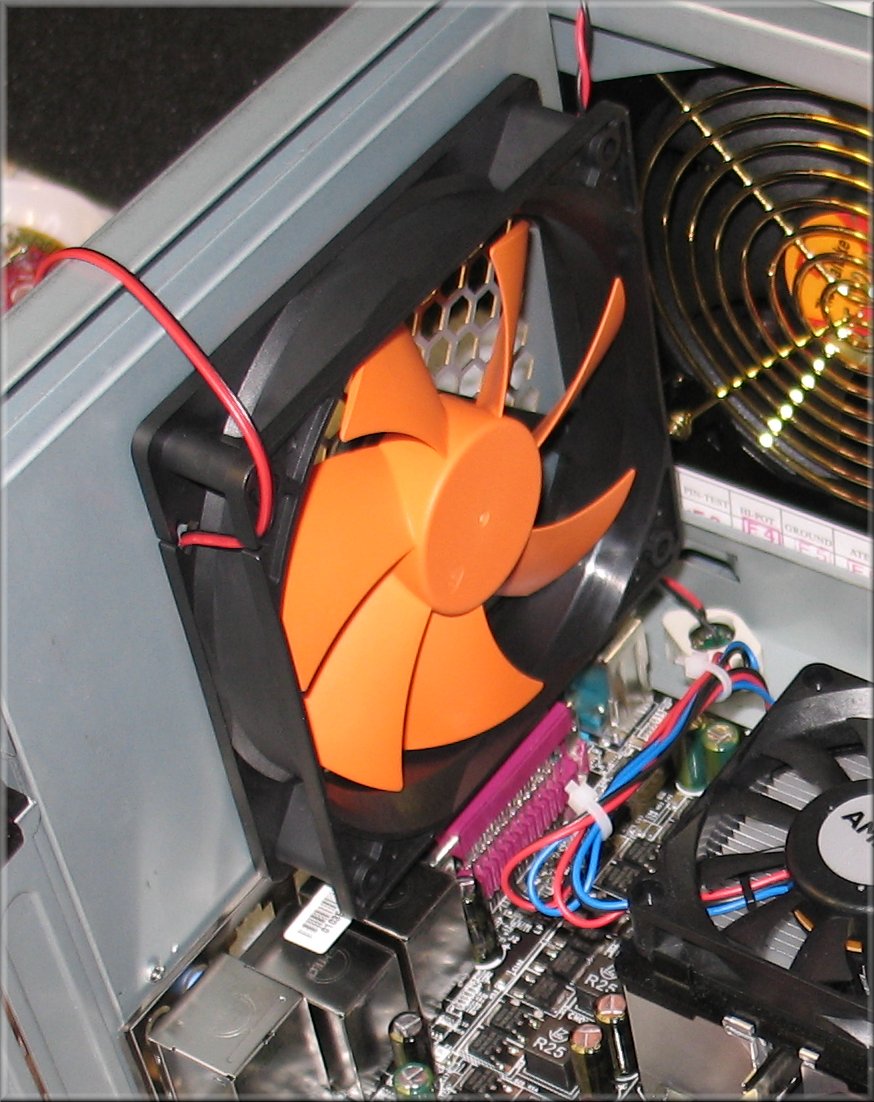
System fans
 Install and plug in system fan(s). Utilize SYSFAN1
for your main system fan. Install and plug in system fan(s). Utilize SYSFAN1
for your main system fan.
If your have additional fans, they will plug directly into
the power supply 4-pin Peripheral Power Connectors.
The system fan on the right is a Thermaltake 120mm,
1300 RPM exhaust fan that came with my ATX chassis case.
RETURN TO MENU
|
|
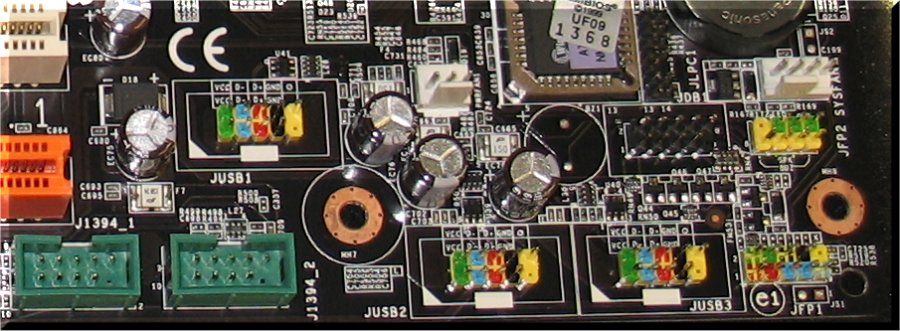
Connectors
Plug in all Connectors paying particular
attention to the wire pin definition chart in the
MSI K9N Diamond
Quick
User's Guide. The key to success here is to CAREFULLY
determine the PIN number by matching it with the corresponding Pin
Definition Signal in the Quick User's Guide.
Believe it or not, in my opinion, this is the most
difficult procedure in the entire PC assembly process...and this step is
not really that difficult, just take it slow and concentrate on the
task at hand.
 The
Connectors on the MSI K9N Diamond
are: The
Connectors on the MSI K9N Diamond
are:
Don't worry about getting any of these connectors
backwards; you cannot harm anything here. If after your initial
boot something here doesn't
work properly, just shutdown the PC, turn the culprit connector around,
and reboot.
RETURN TO MENU
|
|
Barebones?
NOTE: You
may chose to ignore the advice in this section. Read it
and make your own decision.
Barebones simply means do not install/hook up all of
your peripherals before the initial system boot. Choosing to
utilize the barebones technique may become very useful if
your initial boot fails and troubleshooting
is required. A major advantage of barebones is it will not
strain your power supply upon attempting the initial boot.
A Barebones PC will be configured like this:
- Operating System Hard Drive
- mouse
- PS2
keyboard (some USB keyboards on initial boot have failed on the
MSI K9N Diamond)
- One DVD/CD-rom device
- A 56K PCI modem (in PCI Slot 1) to get on the internet for your
download updates (If you do not intend to utilize the onboard
LAN RJ-45 jack.
- Two speakers in 2-channel mode for Stereo-speaker Output
I recommend you do not initially install the following devices:
-
PCI cards
-
Joysticks
-
Palm cradles
-
Printers
-
Other USB devices
This is only my recommendation. What you chose
to do in this area is up to you. The biggest advantage to this
approach is that the Operating System installation will be a lot
smoother. The fewer peripherals the OS has to initially
install will mean a faster installation.
RETURN TO MENU
|
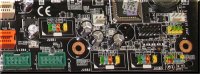
Inspect your Optical (IDE) Devices
The
MSI K9N Diamond only supports two IDE devices
(a Master and a Slave device) on one IDE channel. You may install Optical
Devices (DVD-R/DVD-rom/CD-RW/CD-rom) or hard drives to IDE-1.
The choice is yours. I recommend you install Optical Devices
(DVD-R/DVD-rom/CD-RW/CD-rom) on the IDE channel.
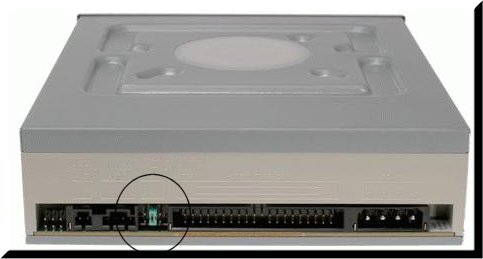
Inspect your IDE devices and ensure the
device jumpers are set to Master/Slave correctly.
Each device should have a legend on the attached factory sticker
explaining it's correct setting. The location of the
master/slave jumper is circled in the photo below. The device
you will use the most should be set as Master.
 I recommend
installing the following IDE devices: I recommend
installing the following IDE devices:
IDE-1 Master: DVD-RW (place your burner on the
Master)
IDE-1 Slave: DVD-rom (place your reader on the
Slave)
One at a time, verify the jumper settings and place your
IDE device into your ATX case.
-
Place the Master IDE device at the top of your
ATX case. Attach the device to the bay using two
screws on each side. (My Thermaltake Armor Jr. ATX case is configured
to use tool-free drive bay rails.)
-
Place the Slave IDE device under the Master
device in your ATX case. Attach the device to the bay
using two screws on each side.
Use the rounded red IDE cable that came in the
MSI K9N Diamond box
and connect the devices to your mainboard in the yellow slot IDE 1.
Notice the square notch in the middle of the IDE 1 connector, match this slot with the
slot on the IDE cable.
Connect a 4-pin Peripheral Power Connector(s) to the back of your optical
device(s).
RETURN TO MENU
|
|
Floppy Drive
Place your floppy drive into a 3.5 inch bay in your
ATX case. Screw the floppy drive into the bay using two screws on
each side.

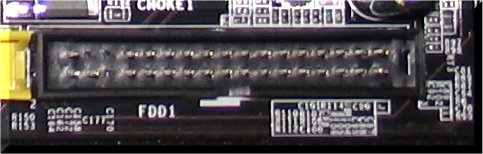
Use the rounded red FDD cable that came in the
MSI K9N Diamond
box and connect the devices to your mainboard in the black slot
FDD1.
When attaching the ribbon cable to the back of the
floppy drive, ensure the "twist" in the cable is on the back-left of
the unit. The "twist" on the cable goes to the left. It
only works one way.
Connect the 4-pin Floppy Drive Power Connector to
the back of the floppy drive.
NOTE: If your floppy drive
doesn't work after OS installation you probably just have to turn
the cable around; you may have it backwards.
RETURN TO MENU
|
|
Hard Drives
The
MSI K9N Diamond comes with six SATA
connectors. I highly recommend using only SATA hard drives,
although if you chose to use IDE this is entirely up to you.
Install your hard drive(s) in a 3.5" bay in your ATX
case. If you install more than one hard dive try to space them
apart for better air flow. Be sure to attached your hard
drive(s) with two screws on each side.
My system is configured as follows:
-
SATA1 - 80GB (Windows Vista Home Premium & programs)
-
SATA2 - 250GB (Data, MP3, documents, photos, etc.)
-
SATA3 - 120GB (Windows 7 RC build 7100 & Programs)
-
SATA4 - 500GB (Backup of all data files auto configured to start
weekly)
-
SATA5 - Open
-
SATA6 - Open
NOTE: If you are only using
SATA hard drives the bios will automatically configure SATA1 as the
Operating System hard drive.
RAID: If you plan to utilize
RAID your hard drives should be exact models with the same
specifications to obtain the best performance. JBOD array
allows the combining of odd size drives into one big drive.
See Appendix C of the Quick User's Guide for more info.
I am not running RAID on my PC.
Connect a red SATA cable to the back of your hard
drive(s). Connect the other end to the SATA connector on the
mainboard.
Connect a 5-pin SATA Power Connector to the back of your
hard drive(s).
RETURN TO MENU
|
|
Video Card(s) and
Scaleable Link Interface
Plug your Video card into the PCI-E1 slot and connect the
monitor.
If you will run two video cards in SLI
configuration (Scalable Link
Interface (SLI)) seat the second video card into PCI-E4 and attach the
SLI Video Link Card (bridge).
NOTE: If you install two x16 video cards
in SLI configuration
make sure that they are the same brand and specifications.
If your video card(s) have a power connector slot
attached it to a 6-pin PCI Express Power Connector JPWR2.
RETURN TO MENU
|
|
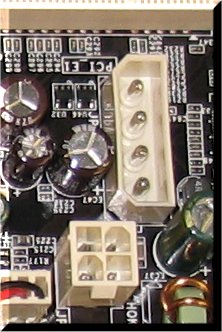
Hook up the power
  There are 3 power connectors on the
MSI K9N Diamond
mainboard. There are 3 power connectors on the
MSI K9N Diamond
mainboard.
-
JPWR1 - ATX 24-pin Power Connector
-
JPW1 - ATX 12V Power Connector
-
JPWR2 - ATX 12V Power Connector
Plug in the 24-pin power connector at JPWR1.
Plug the square 4-pin connector into JPW1.
Plug the standard 4-pin peripheral power connector into JPWR2.
In the United States ensure the voltage switch is
set to 120. Most countries outside of the U.S. will use 220
volts.
RETURN TO MENU
|
|
LAN (RJ-45) Jack and/or Modem
Plug
your LAN (RJ-45) cable into the Jack on the Back Panel.
If you do not intend to utilize the onboard LAN (RJ-45)
Jack for online internet updates now is the time to install your 56K
modem PCI card in PCI Slot-1.
Hook your telephone Jack to the back of your modem
card.
NOTE: Modems
have two phone jacks on the back: one is for the line connected to
the wall jack. The other is for plugging in a telephone, answering
machine, fax machine, etc.
RETURN TO MENU
|
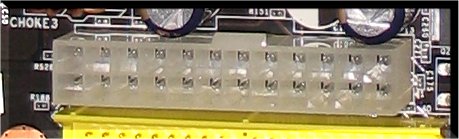
Very Important Step -
Clear the CMOS
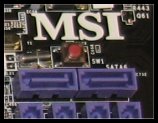 Clear CMOS by using the "Clear CMOS button"
(SW1) method. Clear CMOS by using the "Clear CMOS button"
(SW1) method.
RETURN TO MENU
|
|
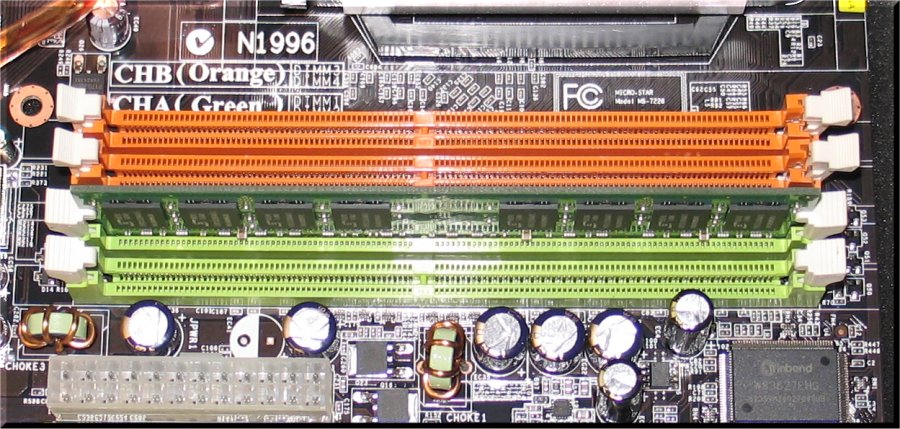
DDR2 DIMM
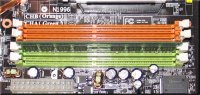 Place one
(and only one) DDR2 DIMM stick into DIMM1 on the
MSI K9N Diamond mainboard. Place one
(and only one) DDR2 DIMM stick into DIMM1 on the
MSI K9N Diamond mainboard.
If you have more sticks, you will add them after subsequent successful boots.
NOTE: If you have two matched
sticks of DDR2 DIMM the second stick will be placed in DIMM3. This
will result in "Dual-Channel" memory population.
RETURN TO MENU
|
|
THIS CONCLUDES THE SYSTEM BUILD |
|
First Real System Test -
The Initial Boot
Set your PC upright and
do not replace the
side panel. You want to have a clear view of the inside of the
Chassis while the PC initially boots to bios.
If the back of your Power Supply Unit has an on/off
toggle switch ENSURE IT IS OFF.
Plug the power cord into the
back of the Power Supply. Plug the other end into an AC outlet.
Ensure the following are attached to your PC:
-
mouse
-
PS2
keyboard (USB keyboards on initial boot have failed on the
MSI K9N Diamond)
-
monitor attached to video card in PCI-E1
-
LAN cable or 56K modem PCI card
Turn ON your monitor.
If the back of your PSU has an on/off switch turn
it on now.
Press your PC chassis "ON" button to Boot your PC.
The first thing you will see on the monitor is the bios screen.
You may hear a single beep from bios after the power-on test is
completed.
- Look at the CPU fan. Is it turning? If not
shutdown the PC.
- Look at the NorthBridge heatsink fan. Is it turning?
- Can you hear the hard drive spinning?
- If your Graphics card has a fan is it
turning?
- Look at the Chassis and System fans. Are they turning?
Shutdown the PC if you encounter any of the
following:
- Strange, weird, or excessive noise from a
component
- Smoke/arc/electrical flash
If all goes according to plan your computer will boot to
the bios screen. Congratulations! Your system has passed the
Initial Boot. You are half-way there!
If your PC did not boot to Bios see my
Troubleshooting Guide.
Let your PC run and continue to the
next step.
RETURN TO MENU
|
|
Post-boot Initial Checks
At this point you will want to perform some simple
initial checks. This can be performed while your PC is running for
the first ten minutes.
Check the following indicators:
Perform the following tests:
-
Press your Optical Drive(s) eject button. The
tray should move.
-
Place a diskette in the Floppy Drive. The
light should come on.
-
Test the Caps Lock and Number Lock on your keyboard.
After ten minutes have passed
restart the PC
and watch the initial boot screen carefully.
-
Does your total DIMM display correctly?
-
Do your Hard Drives display correctly?
-
Do your Optical Drives display correctly?
-
Was your keyboard detected?
Last test:
RETURN TO MENU
|
|
AMI Bios
Once you have completed the Post-boot initial checks
above it will be safe to enter bios for the first time.
|
If you are not familiar with the Bios Setup Menu
STOP and read "Bios Setup" in the K9N Diamond "Quick User's
Guide". |
|
To enter Bios, press the "Delete"
key when your PC initially boots. |
Continuously hit the DEL key until the Bios Main Menu screen is displayed.
Enter "PC Health Status" and Check your CPU temp.
IMHO a temporary stable temp is anything less than 100f. If your
temps are above 100f you may have installed your heatsink incorrectly.
Fix it before continuing.
Press ESC to return to Bios Main Menu.
To prepare your system for the Second Real System Test -
The Operating System Installation you will set
the bios to the "Fail-Safe Default" settings. These are the most
stable settings recommended by the Bios manufacturer.
Enter "Load Fail-Safe Defaults" and then
select OK.
Press ESC to return to Bios Main Menu.
Enter "Advanced BIOS Features" in Bios.
Modify the
"Boot Sequence" for the Operating System (OS) you plan to install.
Set 1st
Boot Device to "CD/DVD" IDE1 Master.
Press ESC to return to Bios Main Menu.
All other Bios settings can wait until later when
your OS is installed and your system is stable.
RETURN TO MENU
|
|
Do not proceed to the next step until you have at least 2 hours to spare. |
|
Second Real System Test -
The Operating System
Installation
Place the WIN XP/Vista/WIN 7 Install DVD/CD into
the CD/DVD tray. The system will look for the '.iso' file.
While still in Bios select "Save & Exit Setup".
Your PC will now "reboot" to
"DVD/CD" for WIN Vista/XP install.
NOTE: ALWAYS perform an Operating System
"Clean" Install from
the Fail-Safe Default Bios settings. Format and
partition the hard-drive (HDD) according to your preferences.
I recommend using
"NTFS" on the primary petition.
Activate the Windows Firewall.
After the OS has been installed and boot up is
successful, let the PC run for
at least ten minutes.
The first program you Install should be your anti-virus
program.
RETURN TO MENU
|
|
Check for stability
If your system is stable for ten minutes you can shut it
off an install any addition DDR2 DIMMs you may have.
NOTE: If you have two matched
sticks of DDR2 DIMM they will be placed in DIMM1 and DIMM3. This
is optimum "Dual-Channel" mode.
Reboot and check for the additional DIMM status and PC stability.
Once your PC is in Windows and is stable follow my other
Bios
suggestions.
Reboot and once again check for stability.
Plug your speakers into the back panel connectors per
Appendix B of the "Quick
User's Guide".
RETURN TO MENU
|
|
Driver Installation
 If
your PC is running fine it's time to install the drivers. If
your PC is running fine it's time to install the drivers.
Install drivers from the
MSI K9N Diamond CD or download from
the
MSI site.
Having these available before hand is a good idea and much quicker.
NOTE: The drivers on the MSI
website may be more up-to-date.
Test your internet connection. And go straight
to the Windows Update site.
Install
all Windows Updates from the
Microsoft website.
WARNING: Do not
surf the internet until your anti-virus program is installed.
If utilizing Scalable Link Interface (SLI) install the
NV SLI driver/utility.
- Connect the video output to the first card (PCI-E1).
- Later, you will install the NV SLI driver/utility where you will check the
"Enable Multi-GPU" box to enable SLI function.
- Upon reboot you will get a system pop-up message saying "Multi-GPU has been
enabled".
Check the "Quick
User's Guide" for more specific information on SLI.
If utilizing RAID consult Appendix C of the "Quick
User's Guide". (I do not use RAID).
RETURN TO MENU
|
|
Adding other
devices
Once your PC is stable you can add your other HDD/devices
one at
a time. Reboot each time and watch for stability
problems.
Always power down your PC and unplug the
power cord when entering your ATX case.
RETURN TO MENU
|
|
Congratulations!
If everything went well and your new
MSI K9N Diamond system is running
fine, I congratulate you on a job well done!
Micro Star
International (MSI) makes fine quality mainboards and the
MSI K9N Diamond is the best!
If you have any problems please do not hesitate to
contact me. I'll try my best to assist you. If you would
like to speak to me on the telephone please send me an email and I will
give you my phone number. I do not accept collect phone calls. My
advice is free of charge.
PLEASE NOTE: I am not a professional computer
consultant. I have no certifications. This is simply one
of my hobbies.
RETURN TO MENU
|
|
Troubleshooting
My Troubleshooting Guide is here.
RETURN TO MENU
|