|
TROUBLESHOOTING
GUIDE - REV 7.1
Updated:
Tuesday, May 17, 2011
Although I wrote these procedures specifically for a
MSI K9N Diamond
running
Vista Home Premium, they can be applied to any PC
build and Windows OS.
I am not a professional computer
consultant. I have no certifications. This is simply one
of my hobbies.
|
Would you like to help me? If the information on this page
helped you I would appreciate your feedback.
View Feedback
Leave Feedback
|
You came to this page for one of
two reasons:
Although there are a few "pearls
of wisdom" here, most is just common sense.
I've broken this Troubleshooting
Guide down into several sections:
MENU
If you believe any of the
information posted below is inaccurate please contact
me.
|
|
About troubleshooting
Effective troubleshooting consist of taking logical
steps and documenting the results. You start with the most
obvious solutions and make your way up the chain to complex
solutions.
Some people say troubleshooting a PC is like looking
for a needle in the haystack. Believe me, there are far less
components in a PC than there are pieces of hay in a haystack.
You should be able to resolve any PC problem in less than 3 days.
It really is simple. Your PC will either reach a stable state
or you will have to purchase replacement parts.
The goal of troubleshooting is to make your PC
stable. If you recently added a new piece of hardware (DIMM,
optical/hard drive, etc.) or added new software/drivers and your PC is acting strangely then you
may want to go back to the earlier configuration when your PC was
stable. In this case it is easy to determine the fault.
Most PC problems arise during or shortly after a new
build or after adding new hardware/software/drivers.
The first step in any form of troubleshooting is
determining the symptoms, then formulating a plan of attack.
More to follow later....
RETURN
TO MENU
|
|
Entering your ATX Case Chassis
Use this procedure EVERY TIME you have to enter your ATX Case
Chassis.
- Choose a clean room to work on your
MSI K9N Diamond.
- A room with ceramic tile or a wooden floor is best. A
carpeted room is worst, i.e. do not place the chassis directly
on a carpeted floor to work on it.
- Wash your hands to remove any grease or body oil. If you
have long hair wear a hair net or hat.
- Remove the soda cans and/or other drinks, food, etc. from
the work area. You don't need the hassle of a spill.
- TURN OFF THE PC. I mean it! Do it EVERY TIME.
I warned you!
- Remove the access panel and place it where it will not be in
the way.
- Ground yourself by touching the power supply
or the ATX
case.
- Grounding straps are a good investment and they are
very cheap.
RETURN TO MENU
|
|
My PC will
not boot
Review my
MSI K9N Diamond build procedures
here.
FIRST PROCEDURE
|
INITIAL CONDITIONS |
| You booted your PC
for the first time |
| Your
PC did not
successfully boot to the Bios screen |
Turn off your PC and
enter the chassis.
Ensure all components are seated/installed on
the mainboard correctly:
-
Graphics card
-
DIMMs
-
CPU & Heatsink
-
SATA/IDE/FDD cables
-
Master/Slave jumpers are correct on IDE
channel
- All three power connectors are connected:
-
JPWR1 - ATX 24-pin Power Connector (Main
Power)
-
JPW1 - ATX 12V Power Connector (CPU
Power)
-
JPWR2 - ATX 12V Power Connector
(Graphics card Power)
Once your components have been reverified reboot
the PC.
RETURN
TO MENU
SECOND PROCEDURE
|
INITIAL CONDITIONS |
| You booted your PC
for the first time |
| Your
PC did not
successfully boot to the Bios screen |
| You
attempted the First Procedure above and it did not fix
the problem |
| This procedure is
also used for:
|
Turn off your PC and enter
the chassis.
As stated in the
MSI K9N Diamond
Quick
User's Guide the NForce chipset is very sensitive to ESD
(Electrostatic Discharge). This may have a "footprint" in the
memory module(s) power code. Perform the following:
-
Shut Down the PC.
-
Unplug the Power Supply from the AC outlet and
unplug the cord from the back of the Power Supply.
-
If your Power Supply has an On/Off switch on the
back of it turn it Off.
-
Ground yourself and your PC.
-
Remove all DDR2 DIMMs
-
Remove the following power connectors on your
mainboard:
-
JPWR1 - ATX 24-pin Power Connector
-
JPW1 - ATX 12V Power Connector
-
JPWR2 - ATX 12V Power Connector
-
Clear CMOS.
-
Reattached power connectors in Step 6 above.
-
Place a DDR2 DIMM in DIMM3 (the slot closest to
the CPU).
-
Plug AC cord into Power Supply and AC outlet.
-
If your Power Supply has an On/Off switch on the
back of it turn it back On.
-
Boot the PC.
RETURN
TO MENU
THIRD PROCEDURE
|
INITIAL CONDITIONS |
| You
attempted the First & Second Procedures above and they did not fix
the problem |
Turn
off your PC and enter the chassis.
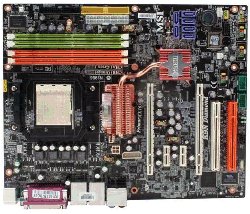
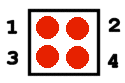
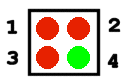
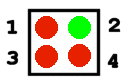
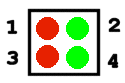
- Install the D-Brackett™2 that comes with your
MSI K9N Diamond. It
integrates four LEDs and allows users to identify system
problems through 16 various combinations of LED signals. In order for your D-Brackett™2 to
work properly it has to be plugged in to the JDB1 pins. If you like,
print the
D-Brackett™2 chart on a
color printer
with HP or
Brother toner.
- Ensure you are in a position where you
can view the LED signals on the D-Brackett™2.
- Boot the PC.
- Observe the LEDs on the D-Brackett™2.
- Record results.
- Match LED signal results with Description
here.
Most signal results are
informational only and some will refer to a specific piece of
hardware which may be the source of the problem. Take
action as appropriate. The signal errors below are the most
common with failed boots.
FOURTH PROCEDURE
|
INITIAL CONDITIONS |
| You
attempted the First, Second & Third Procedures above and they did not fix
the problem |
| Your
PC will not
successfully boot to the Bios screen |
Turn off your PC and enter
the chassis.
Barebones your PC. Barebones simply
means do not install/hook up all of your peripherals.
A Barebones PC will be configured like this:
- Operating System Hard Drive
- mouse
- PS2
keyboard (USB keyboards on initial boot have failed on the
MSI K9N Diamond)
- One DVD/CD-rom device
- A 56K PCI modem (in PCI Slot 1) to get on the internet for your
download updates (If you do not intend to utilize the onboard
LAN RJ-45 jack.
- Two speakers in 2-channel mode for Stereo-speaker Output
Once again let me emphasize:
No PCI cards.
No
joysticks. No Palm cradles.
No
printers,
No second DVD/CD-rom device,
No
other USB devices, ETC. ETC.
The biggest advantage to this
approach is that the initial system boot will be a lot
smoother. The fewer peripherals the system has to initially
identify and
install will mean a faster boot. In addition, this
barebones technique
not strain your power supply.
Once your PC is configured as described in this
procedure follow the directions in the FIRST PROCEDURE above.
RETURN
TO MENU
|
|
My PC will
not load Windows
Review my
MSI K9N Diamond build procedures
here.
FIRST PROCEDURE
|
INITIAL CONDITIONS |
| Your system
successfully boots to Bios and appears stable. |
| Your
initial/subsequent Windows installation failed |
Turn off your PC and enter
the chassis.
Before attempting to loading
Windows again barebones your PC. Only install the following:
- Monitor
- One hard drive
- One CD/DVD optical drive
- PS2 keyboard (USB keyboards on initial boot have failed on the
MSI K9N Diamond
- Mouse
- No Speakers
- No Printers
- No scanners
- No Joysticks
- No other USB devices
NOTE:
At this point if you have installed additional hard drives, CD/DVD
optical drives, printers, etc., just unplug the IDE/SATA/USB cables
and power connectors.
The goal here is to load Windows
with the least amount of stress on the hardware installation.
-
Enter Bios. Enter "Load Fail-Safe Defaults" and then
select OK. Press ESC to return to Bios Main Menu.
-
Enter "Advanced BIOS Features" in Bios. Modify the
"Boot Sequence" for the Operating System (OS) you plan to install. Set 1st
Boot Device to "CD/DVD" IDE1 Master. Press ESC to return to Bios Main Menu.
-
Place the WIN Vista/XP Install DVD/CD into
the CD/DVD tray. While still in Bios select "Save & Exit Setup".
-
Your PC will now "reboot" to
"DVD/CD" for WIN Vista/XP install.
NOTE: ALWAYS perform an Operating System
"Clean" Install from
the Fail-Safe Default Bios settings. Format and
partition the hard-drive (HDD) according to your preferences.
When I installed Vista the installation only took
about 25 minutes. Towards the end of the installation my
monitor turned all black for about five minutes. My hard drive
LED still showed activity during this time. When my PC
automatically rebooted my monitor came back on. So - if your
monitor turns black during the Vista installation just ride it out
and see what happens.
RETURN
TO MENU
|
|
My PC
freezes/unexpectedly restarts/BSOD
Review my
MSI K9N Diamond build procedures here.
|
INITIAL CONDITIONS |
| Your
PC is able to boot to Bios and Windows |
| Your
PC freezes |
| Your
PC unexpectedly restarts |
| Your
PC goes to BSOD |
Freezes, restarts, and BSODs are
caused by hardware and software problems.
- If your PC was stable until
you replaced or added new hardware it is most likely a hardware
problem.
- If your PC was stable until
you loaded new software then it is most likely a software
problem.
SOFTWARE
- Visit the manufacturer's
website and ensure you are running the latest version of the
software. Software vendors update their software with
"patches".
- Nearly every piece of
software available has been patched by the manufacturer.
- Ensure you have the latest
patch installed.
- Ensure you selected the
proper patch for your Operating System, XP, Vista, etc.
- Check for patch updates on a
regular basis.
- Enable Windows Update.
- Use a Windows Registry Cleaner program.
I recommend RegCure.
RETURN
TO MENU
FIRMWARE
- Firmware is software that is embedded in a
hardware device. It usually resides in the Flash ROM.
- If you are having trouble with a specific
peripheral check to see if it has firmware and what version it
is.
- Check your hardware manufacturer's website to
ensure your peripheral has the lasted firmware installed.
- Most Optical Devices (CD-RW, DVD-R, MP3 players)
have firmware.
RETURN
TO MENU
DRIVERS
- Hardware needs "Drivers" to operate correctly
in the Operating System.
- When you install new hardware load the
drivers.
- After loading new drivers from a CD-rom
always check online for newer versions.
- Ensure your drivers are up-to-date for your
Operating System, XP, Vista, etc.
- If you updated a driver and now your PC is
not stable use this procedure to roll back your driver.
- Check for driver updates on a regular basis.
- For the
MSI K9N Diamond
mainboard always use
NVIDIA drivers.
- The most important drivers are the Graphics
Driver.
RETURN
TO MENU
BIOS
- Bios is the first program run when your
PC is turned on.
- The primary function of the BIOS is to prepare the machine
so other software programs can load, execute, and assume control
of the PC.
- Only flash your Bios to fix a problem.
- Do not flash your Bios just because a new version was
released.
- If your PC is running fine do not flash your Bios.
- MSI K9N Diamond
Bios updates can be found
here.
- Flash your bios using this procedure.
RETURN
TO MENU
OPERATING SYSTEM
- Ensure you have the latest Service Pack installed.
- Enable Windows Update.
- If your OS is damaged you can "Repair"
it.
-
Follow this Vista Repair guide.
- If any of the above "Repairs" do
not fix the problem then
perform a Clean Installation.
RETURN
TO MENU
HARDWARE
I installed new hardware and
now my PC is not stable
Power Supply Unit (PSU)
-
Ensure your PSU is at
least 500W with a minimum of 28 Amps on +12v.
-
For the
MSI K9N Diamond
ensure
JPWR1 - ATX 24-pin Power Connector (Main Power), JPW1
- ATX 12V Power Connector (CPU Power), and JPWR2 - ATX 12V
Power Connector (Graphics card Power) are connected to the
PSU.
Video Card
- Ensure the card is seated
properly.
- If your card has a power connector
attached it to a 6-pin PCI Express Power Connector JPWR2.
- Ensure the latest drivers are installed.
- If your card has a built-in fan verify that it
works/turns.
- Verify it's correct operation in Device Manager.
The Device Status General Tab should say, "This device is
working properly".
DDR2 DIMM
- Ensure the DIMM is seated
properly.
- Ensure the DIMM is on the
manufacturer's Test List of approved hardware.
- Run the latest version of Memtest86+ (http://www.memtest.org)
memory test program. Replace DIMM if it fails the test.
- Test each DIMM individually.
- Adjust DIMM voltage in Bios.
See DIMM manufacturer's voltage specifications.
- Some DIMM will not work
properly if the voltage is set to "Auto" in Bios.
- I use Kingston DIMM set to
"Auto" in Bios.
Hard Drive
- Ensure the HDD is connected
properly (SATA or IDE).
- If IDE, ensure Master/Slave
is set correctly.
- Ensure your HDD has a power connector
attached to it.
- Verify it's correct operation in Device Manager
- . The Device Status General Tab should say, "This device
is working properly".
- Run Tools (Error-checking and Defragmentation)
to check your HDD.
Optical Drive
- Ensure the Optical Drive is
connected properly (SATA or IDE).
- If IDE, ensure Master/Slave
is set correctly.
- Ensure your Optical Drive has a power connector
attached to it.
- Ensure the latest Firmware is installed.
- Verify it's correct operation in Device Manager.
The Device Status General Tab should say, "This device is
working properly".
CPU
- Verify it's correct operation in Device Manager.
The Device Status General Tab should say, "This device is
working properly". Dual-core CPUs will have TWO listings
in Device Manager.
- Ensure your CPU is seated properly in the AM2
socket.
- Ensure your heatsink is seated properly on the
CPU.
- Check CPU temperature in Bios.
RETURN
TO MENU
|
|
My PC boots slowly
|
INITIAL CONDITIONS |
| Your system
successfully boots to Windows and appears stable. |
| Your
PC boots to Windows slowly. |
A slowly booting PC is related to hardware and software
problems. They can both be easily identified and fixed.
The causes of a slow boot are:
-
Your Primary Boot Hard
Drive is more than 80% full.
-
Boot Hard Drive
cache is too small, 2MB, etc.
-
Boot Hard Drive RPM is too
slow, i.e. 5400 rpm.
-
Your ATA speed is too slow,
i.e. 33
-
Your IDE cable is not rated
high enough.
-
Your Primary Boot Hard Drive
is not configured to boot first in Bios.
-
Primary Boot Hard Drive
is too small.
-
Primary Boot Hard Drive is
fragmented.
-
Your Primary Boot Hard Drive
may have bad sectors or file folder errors.
-
Your Desktop may have too
many icons.
-
You only have one hard
drive on your PC.
-
Your PC does not have enough
RAM.
-
You have an excessive
number of programs in the Windows Startup folder.
-
System Configuration
Startup is loading too many programs.
-
Your PC has a virus.
-
Drivers/Firmware are
out-of-date.
-
Windows is out of date, i.e.
Service Pack.
-
Windows Operating System is
corrupted.
-
Your Windows Registry has
unnecessary entries.
Fixes:
-
Ensure your Primary Boot
Hard Drive is no more than 50% full.
-
Purchase a hard drive
with at least 8MB of cache, 16MB cache is much better.
-
Purchase a hard drive with a
RPM of at least 7200 rpm.
-
I recommend a Primary
Boot Hard Dive size of 80GB.
-
Ensure your hard drive
supports ATA 133.
-
Ensure your IDE cable is
rated for ATA 133.
-
Configure your Primary Hard
Drive to boot first in Bios.
-
Add more RAM to your PC.
2GB is best in Dual-Channel mode.
-
Run "Defragmentation" from
hard dive Tools.
-
Run "Error-checking" from
hard drive Tools.
-
Clean up your Desktop and
remove unnecessary icons.
-
Reserve your Primary Boot
Hard Drive for the Operating System and Program files only.
Purchase a second hard drive to store all of your data files
(MP3s, Word documents, Digital Photos, etc.).
-
Remove all programs
from the Windows Startup folder.
-
Verify System
Configuration Startup and configure as recommended
here.
-
Scan your PC for
viruses/spyware on a regular basis and take appropriate action.
-
Ensure your drivers/firmware
are up-to-date.
-
Ensure you are running the
latest Windows Service Pack.
-
Repair Windows Operating
System.
-
Purchase a Registry Cleaner
Program and run it.
System Configuration
Startup
- Exit all programs.
- Go to Start > Run >
- In the "Open" box Type "msconfig"
and select "OK".
- In System Configuration
select the "Startup" tab.
- You will concentrate on
the "Startup Item" and "Command" columns.
Programs that load when
Windows boots will have a checkmark in the box next to the
Startup Item. The majority of the programs are NOT
critical to your PC booting to Windows and only slow down
the boot process. These programs should be removed
from the boot process by unchecking the checkmark in the box
next to the Startup Item.
- These programs SHOULD be
checked. Drag the column dividers with your mouse so
you can read the full descriptions.
- Anti-Virus and
Spyware programs
- Windows Operating System programs
- Video card support
- All other programs should
be unchecked. Drag the column dividers with your mouse
so you can read the full descriptions. Example programs
are Adobe, AOL, Nero, Creative, Logitech, etc. The only
sidebar here is that if you KNOW you want a program to load at
boot leave the checkmark in the box next to the Startup Item.
You can always go back later and recheck a box if needed.
- Select "Apply", then
"OK", and "Restart".
- Your PC will now reboot.
- When your PC boots back to the Windows Desktop a message will
appear that you have "altered the ways Windows starts". Select "OK".
- Your PC should have booted faster.
RETURN
TO MENU
|
|
Miscellaneous Procedures
CLEAR CMOS
Turn off your PC and
enter the chassis.
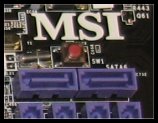 There is a custom red
button on the
MSI K9N Diamond
mainboard, just above the six SATA connectors.
The CMOS RAM is powered by an external battery to keep the system
configuration data. If you need to clear the CMOS RAM system
configuration all you have to do is press the CMOS button to clear
the data. I recommend pressing and holding the button for at least two
seconds. There is a custom red
button on the
MSI K9N Diamond
mainboard, just above the six SATA connectors.
The CMOS RAM is powered by an external battery to keep the system
configuration data. If you need to clear the CMOS RAM system
configuration all you have to do is press the CMOS button to clear
the data. I recommend pressing and holding the button for at least two
seconds.
Please note: If your
USB keyboard does not respond after clearing CMOS, use a
PS2
keyboard (Once you reset CMOS, booting from a USB keyboard has a
history of failing on the
MSI K9N Diamond). Sometimes,
not always.
RETURN TO MENU
ONBOARD SOUND DOES NOT
FUNCTION
|
INITIAL CONDITIONS |
| OS
Vista was successfully installed |
| Your
speakers are connected to the Audio Port Connectors on
the back of the mainboard |
| No
sound is coming from your speakers |
The
MSI K9N Diamond
comes with a build-in Creative® Sound Blaster Audigy SE sound card.
It offers 24-bit/96 KHz audio quality, 100db
signal-to-noise ratio (SNR) – which is a professional level
and up to 7.1 channel audio with SPDIF-out. It
also supports
EAX Advanced HD 3.0
and Dolby Digital EX.
The current Creative SB software
(the CD that came with your speakers) will work with XP but not Vista.
However, your speakers will still work with the native Vista drivers
included on the Vista installation DVD.
If you are running Vista and have no
sound perform the following:
1. Uninstall the Creative SB
software from programs (it's not Vista ready and will not work
anyway)
2. Uninstall the Creative SB entries from Device Manger Properties
3. Disconnect your speakers
4. Return
to Desktop and then shutdown the PC
5. Reconnect your speakers and boot to Desktop. You should
now have sound.
6. Install the Creative SB Audigy SE Vista drivers
from the
Creative website.
If you still do not have sound:
1. Ensure the "Onboard
Audio Controller" is enabled in bios.
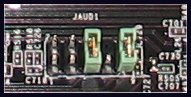
2. Ensure JAUD1 is jumpered on your mainboard. Pins 5-6
and 9-10 need to be jumpered to have sound directed to the back of
the mainboard. See page 2-15 of the Quick User's Guide.
RETURN TO MENU
INSTALLING A
NEW AM2 CPU
|
INITIAL CONDITIONS |
|
Your PC is stable |
| Your
bios supports the new CPU speed |
Turn off your PC and enter the chassis.
- If necessary,
update
your bios.
- Complete Steps 1-6 in
My PC will not boot -
SECOND PROCEDURE.
- Unplug the CPUFAN1 connector.
- Carefully remove the heatsink.
The thermal paste will have bonded with the top of the old
CPU and the bottom of the heatsink. You will have to
clean the bottom of the heatsink and remove all traces of
the thermal paste if you intend to reuse the heatsink.
- Remove the old CPU by pulling the AM2 Socket lever
slightly sideways away from the socket and lift it up to a 90-degree
angle.
- Using your fingers remove the old CPU from the AM2
socket.
-
Remove your new CPU from it's protective box and be careful
not to touch the pins with your fingers.
-
Hold the new CPU by it's
edges.
-
Look at the new CPU closely. Look for the Gold Arrow in
one of the CPU's corners and point/align it towards the lever pivot on
the mainboard CPU AM2 socket seat. THE CPU WILL ONLY FIT IN ONE
ORIENTATION.
-
Using very little force (gravity alone may suffice....)
drop the new CPU onto the CPU AM2 socket seat and it's pins should all lineup
and the CPU pins should embed into the socket.
-
Hold the CPU down
with your fingers and close/lock the lever.
- Follow my
heatsink installation instructions.
- Complete Steps 7-12 in
My PC will not boot -
SECOND PROCEDURE.
RETURN TO MENU
- Click on Control Panel > Device Manger
- In Device Manager highlight the specific device that
needs the driver rolled back.
- Right-click the device and select Properties.
- Select the second Tab (Driver) and select Roll Back
Driver.
- A pop-up window will confirm if you want to continue the
action.
RETURN TO MENU
|
|
Common Problems and Mistakes
This section is divided into
Problems and
Mistakes.
Problems are due to something
you may have no control over or they may be due to something you
did to your PC like add new hardware, new drivers, etc.
Mistakes are errors that you made while assembling
your PC. In either case it is something you will have to
resolve.
Problem -
Bad mainboard.
-
If you have exhausted all of the
troubleshooting techniques on this page and you still have
problems you may have a bad mainboard.
-
Call MSI Customer Support and request a
Return Merchandise Authorization (RMA).
RETURN TO MENU
Problem -
Inadequate Power
Supply Unit (PSU).
-
Problems related to an inadequate PSU
usually arise when your PC is under load, i.e. when burning
a CD/DVD or when playing a demanding high-end video game.
-
Symptoms are: BSOD and inadvertent
reboots.
-
Use a PSU of at least 500W and with a
minimum of 28 Amps on +12v.
-
For the
MSI K9N Diamond
ensure
JPWR1 - ATX 24-pin Power Connector (Main Power), JPW1
- ATX 12V Power Connector (CPU Power), and JPWR2 - ATX 12V
Power Connector (Graphics card Power) are connected to the
PSU.
RETURN TO MENU
Problem -
Bad DIMM.
-
Symptoms are: BSOD, inadvertent
reboots, and screen lock-ups.
-
Ensure your DIMM is seated properly in the
DIMM slot.
-
Test your memory sticks by running the
latest version of Memtest86+
(http://www.memtest.org),
a ram diagnostic tool that is bootable from a floppy disk or
a CD.
-
Test each DIMM individually.
-
Replace the DIMM if it fails the Memtest86+
test.
-
Most quality DIMMs carry a lifetime
guarantee from the manufacturer.
-
Do not purchase DIMMs which do not carry a
lifetime guarantee.
RETURN TO MENU
Problem -
Bad Bios Flash
-
Perform the Second Procedure above in
My PC will not boot
-
If the procedure above does not fix the
problem repeat the entire procedure again and add this
additional step: Remove the battery in Step 6 and
replace it in Step 8.
-
Flash your bios using
this procedure.
-
Please note: Use a
PS2
keyboard (Once you reset CMOS, booting from a USB keyboard has a
history of failing on the
MSI K9N Diamond)
-
If you are unable to flash your bios after a
bad flash your mainboard may be dead.
-
If you mainboard is dead it's time to go
here.
RETURN TO MENU
Problem
- Monitor will not work.
-
Ensure your video card is seated properly in
the PCI-E1 slot.
-
The
MSI K9N Diamond
has a specific graphics card power supply connection on the
mainboard.
-
Ensure JPWR2 is connected to the PSU.
-
Ensure all graphics card
drivers are up-to-date
-
Some high-end graphics cards
have a dedicated 6-pin PCI-E power connector; ensure it is connected to the PSU.
RETURN TO MENU
Problem
- Bios will not
keep time or settings.
RETURN TO MENU
Problem
- USB will not work.
-
Check your USB controllers in Device
Manager.
-
Enable your USB controller/USB 2.0
controller in Bios.
-
Ensure your USB drivers are up-to-date.
-
Check your USB pin connectors on the
mainboard, they may be installed backwards.
-
Swap USB pin connectors to another USB pin
set on the mainboard and
reboot the PC.
RETURN TO MENU
Problem
- IEEE 1394
Firewire will not work.
-
Check your IEEE 1394 bus host controllers in
Device Manager.
-
Enable your IEEE 1394 controller in Bios.
-
Ensure your IEEE 1394 drivers are
up-to-date.
-
Check your IEEE 1394 pin connectors on the
mainboard; they may be installed backwards.
-
Swap IEEE 1394 pin connectors to another
IEEE 1394 pin set on the
mainboard and reboot the PC.
Problem
-
Onboard GigaBit LAN 0&1 will not function
RETURN TO MENU
Problem
- High temperatures.
-
You must get your temperatures under
control.
-
Consistently high temperatures will kill or
reduce the life of your CPU.
-
High temperature will cause your CPU to be
unstable resulting in unexpected restarts, freezes, or BSOD.
-
High temperatures come in two varieties:
CPU & System.
-
Good CPU temperatures are 100˚F
and below.
-
Okay CPU temperatures are
101˚F-115˚F.
-
Any CPU temperature over
116˚F should be addressed.
-
System temperatures are
usually ~5˚F higher than CPU temperatures.
-
Your PC System
temperature will run cooler in the Winter when your room
temperature is 68˚F then in the Summer when your room
temperature is 85˚F.
-
Ensure your heatsink was
designed for your CPU.
-
Most AMD CPUs come with a
stock heatsink.
-
If the stock heatsink
does not lower your temperatures enough purchase a new
heatsink.
-
Heatsinks come in many
shapes and sizes.
-
Select a high-end
heatsink rather than a low-end heatsink.
-
Ensure the heatsink is installed properly.
-
Ensure your heatsink fan turns.
-
Some heatsink fans have a speed adjustment.
-
Ensure your CPU fan is turning at the proper
speed.
-
Ensure thermal paste was installed correctly
on the CPU.
-
Some heatsinks come with thermal paste
already installed. You only have to remove a piece of
tape.
-
Thermal paste has to cure. It will
take 3-5 days to cure in order to achieve maximum
effectiveness.
-
You must power down your PC during the
curing process to enable your CPU to completely cool for a
few cycles; i.e. shutdown your PC over night - do not leave
it on continuously.
-
Ensure you have adequate fan capacity/air
flow in your chassis.
-
Your chassis should have a minimum of two
fans.
-
The front fan should bring air into the
chassis and the back fan should remove air from the chassis.
-
A 120mm fan is better than a 80mm fan.
RETURN TO MENU
Mistake -
Grounded Mainboard.
-
Your mainboard must be properly attached to
your ATX chassis mainboard tray.
-
For the
MSI K9N Diamond
ensure you use nine metal
standoffs, one in each of the ATX "A" mainboard tray holes.
-
Some mainboards require washers between the
screw and mainboard; the
MSI K9N Diamond does not.
-
If your mainboard
requires washers they will usually come with the mainboard.
-
Ensure that no other metal parts are in
contact with the mainboard.
-
Use a good quality electrical tape to cover
any questionable metal parts which may come in contact with
the mainboard.
RETURN TO MENU
Mistake -
CPU/Heatsink
installed incorrectly.
-
The CPU must be correctly seated into the
AM2 socket.
-
The Gold Arrow in one of the CPU's corners
must point/align towards the lever pivot on the mainboard
CPU seat.
-
Make sure the CPU is seated flush with the
base of the AM2 socket.
-
When the CPU is correctly seated you will
not be able to see any of the pins.
-
If your heatsink is installed incorrectly
you WILL have high temperatures and you WILL run the risk of
burning out your CPU. In addition, high temperatures
may cause your PC to behave erratically.
-
Check your CPU/System temperatures in Bios
or install Dual Core Center.
-
My PC temperatures average: CPU 93F
and System 95F.
RETURN TO MENU
Mistake -
Power LED/HDD LED not
active.
RETURN TO MENU
Mistake -
Optical/Hard drive(s) not present in My Computer.
-
Check your device(s) in Device
Manager.
-
If using the IDE channel ensure OnBoard IDE
Controller is enabled in Bios.
-
If utilizing the IDE channel ensure your
device(s) Master/Slave pins are jumpered correctly.
-
Once the IDE device pins are jumpered correctly reboot
the PC.
-
If using SATA ensure OnChip SATA is set to [Device 0/ 1/ 2]
in Bios.
-
Configure your Boot Sequence in Bios -
Advanced Bios Features.
-
The
MSI K9N Diamond
is a SATA mainboard. I
strongly recommend using only SATA hard drives.
RETURN TO MENU
Mistake -
Floppy drive light always
on.
-
If your Floppy drive light is always on it
means your FDD cable is connected backwards to the back of
your Floppy drive.
-
Simply turn off the PC, enter the case and
turn the cable around on the back of
your Floppy drive and reboot the PC.
RETURN TO MENU
|